

When making HTTP requests using cURL, your request may succeed or fail depending on whether the correct headers are included.
This becomes even more important when proxies are involved, as both headers and proxy configuration with cURL work together to shape how servers interpret your request.
In use cases like API calls, web scraping, or browser emulation, it’s rarely obvious what the server expects. Headers carry vital metadata; they can authenticate your request, indicate the desired response format, and even mimic a human user through the User-Agent.
In this guide, we’ll walk through how to send headers using cURL and show how combining them with Proxying’s proxy infrastructure helps you stay anonymous, bypass restrictions, and improve data access.
What are HTTP Headers?
HTTP headers are key-value pairs sent along with an HTTP request to the response. They help the server understand what the client wants and provide context about the client making the request.
- User-Agent: Mozilla/5.0
- Accept: application/json
- Authorization: Bearer YOUR_API_KEY
These headers tell the server what kind of client is making the request, what content type is expected, and whether the request is authorized.
Basic Syntax for Sending Headers using cURL
To send a custom header in a cURL request, use the -H flag (short for --header).
Here’s the basic format:
curl -H "Header-Name: value" https://httpbin.org/headersFor instance, to set a User-Agent:
curl -H "User-Agent: Mozilla/5.0" https://httpbin.org/headers Note: You can send as many headers by repeating the -H flag.
Sending Headers With POST Requests
Here’s how to send multiple headers in a single request:
curl -H "User-Agent: Mozilla/5.0" \ -H "Accept: application/json" \ -H "Authorization: Bearer your_token" \ https://httpbin.org/headers
Reminder: Use your credentials and target website instead of placeholders.
Make sure there are no spaces around the colon “:” in the header, or you might get unexpected results.
Combining Headers With Proxies
Additional features that make curl headers more potent are the use of rotating or geo-targeted proxies. Proxying supports so-called proxy server solutions; this means you can proxy your requests to resell high-performance residential or datacenter proxies anonymously and localized requests.
Here’s how to send headers while using an HTTP proxy:
curl -x http://username:password@proxy.proxying.io:8080 \ -H "User-Agent: Mozilla/5.0" \ -H "Accept: application/json" \ https://httpbin.org/headersIf you are using SOCKS5 proxies, the command will be:
curl --socks5 username:password@proxy.proxying.io:1080 \ -H "User-Agent: Mozilla/5.0" \ https://httpbin.org/headersThese commands send a request through a proxy and add headers to simulate a browser request.
Reminder: Use your credentials and target website instead of placeholders.
Inspecting Response Headers
To inspect the headers returned by the server, you can use these commands.
Show headers and body
curl -i https://httpbin.org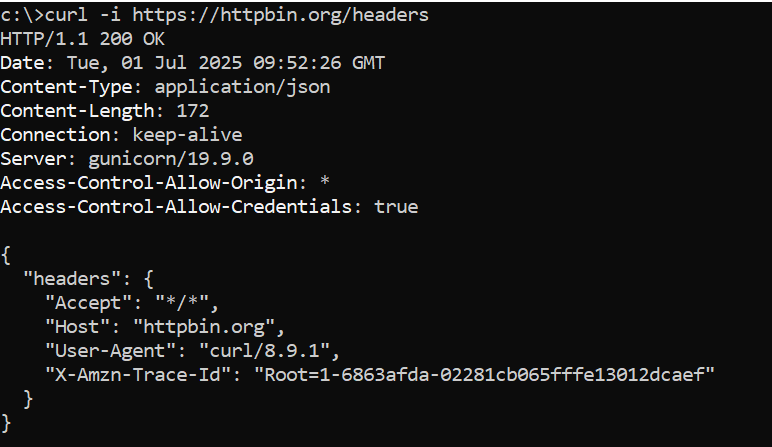
Show headers only (HEAD request)
curl -I https://httpbin.org
This helps verify if your headers were accepted or if additional headers were returned.
Reminder: Use your credentials and target website instead of placeholders.
Use Cases
Using headers and proxies together is useful in various situations:
- Bypass Bot Detection: Set User-Agent and Referer to create an impression of a real browser.
- API Authentication: Add Authorization headers to guard access token-protected resource endpoints.
- Cookie Management: Send Cookies to use sessions between requests.
- Content Negotiation: Retrieve localized or specific formats by using Accept or Accept-Language
cURL GET Header Arguments
- -H /
--header: Adds a custom HTTP header to your request (e.g., User-Agent, Authorization). - -i: Includes the response headers in the output along with the body.
- -I /
--head: Makes a HEAD request and shows only the response headers. --compressed: Adds Accept-Encoding: deflate, gzip to request compressed responses.--user-agent: A shortcut to set the User-Agent header directly.--referer: Sets the Referer header to simulate the request origin.
Conclusion
An easy but powerful method of gaining control over your HTTP requests is to send the headers using cURL. When you are working with APIs or even web scraping on a scale, you can use the headers effectively to convey context and authenticate.
When combined with Proxying‘s proxies, you unlock even more flexibility: rotate IPs, switch countries, and avoid rate limits, all while keeping your requests fully customizable with headers.